Recently, I’ve been working on a server virtualisation proof of concept, using VMware Infrastructure 3 Enterprise. Up until now, my virtualisation experience has all been at the low and mid-end of the market (VMware Player, VMware Workstation, VMware Server, Microsoft Virtual PC and Microsoft Virtual Server) and it’s been really good to get my hands on some enterprise-class virtualisation software (Microsoft Virtual Server 2005 R2 is pretty good, but it doesn’t have a lot of the high end features in the VMware solution, even with the forthcoming Microsoft System Center Virtual Machine Manager; having said that, Virtual Server is free and VMware Infrastructure 3 prices start off with four digits to the left of the decimal point and keep on climbing as you add processors and features – it really is like comparing chalk and cheese!).
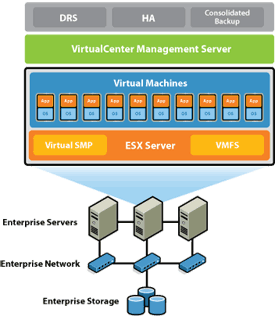
VMware Infrastructure 3 includes:
- VMware ESX Server: high-end virtualisation platform for servers, storage and networking.
- VMware VMFS: high-performance cluster file system for storage virtualisation.
- VMware Virtual SMP: multi-processor support for virtual machines.
- VMware VirtualCenter: centralised management, automation and optimisation for IT infrastructure.
- VMware High Availability (HA): cost effective high availability for virtual machines.
- VMware Dynamic Resource Scheduling (DRS): dynamic balancing and allocation of resources for virtual machines.
- VMware VMotion: live migration of virtual machines without service interruption.
- VMware Consolidated Backup (VCB): centralised backup of virtual machines.
I’ve been using a development system with an HP StorageWorks Modular Storage Array (MSA)-based fibre-attached storage system, an HP SAN Switch 4/8 fibre channel switch and two HP ProLiant DL585s to develop the design for the proof of concept, which will then be expanded with additional functionality (increased capacity and resilience) for a client’s development facilities before (hopefully) going into production. It’s been a pretty steep learning curve in places, and whilst there’s nothing too complicated about it, what follows summarises the things I learnt along the way.
Installation
Firstly, configure the fibre channel network for the SAN. Really, all that is required here is to connect to the console port on each switch, set any switch configuration parameters (date, timezone, etc.) and to confirm that all the small form factor pluggable (SFP) optical transceiver modules are working. It may also be useful to take a note of the worldwide port numbers (WWPNs) for each port. For the entry-level HP switch that I was using, this was a case of entering the following commands:
switchshow
fabricshow
date “MMDDhhmmCCYY“
tstimezone 0,0
Next, the SAN storage can be configured. A serial cable connection to the MSA controller allows access to the console, from where connections to each device can be created (based on the worldwide port numbers for the various fibre channel connections) with a profile name of Linux; and the LUNs can be established to provide access to the disks, for example:
add unit 0 raid_level=5 data=disk101-disk106 cache=enable
set global system_name=”VMware Dev SAN” read_cache=70
add connection connectionname wwpn=wwpn profile=Linux
This is where I came across my first issue – I found that sometimes, if the connected server is not running (with an operating system, or at least the VMware ESX installation program), the fibre channel host bus adapters (HBAs) may not be detected making it impossible to create connections. It’s also worth knowing that VMware can manage multiple paths to SAN storage, so it’s not necessary to purchase separate multipathing software.
Once the SAN is set up (and any local server configuration is complete, such as array configuration for direct attached storage), installing ESX Server is straightforward – simply boot from the CD and follow the wizard (the process can also be automated using kickstart); however a Windows server will also be required from which to manage the virtual infrastructure, along with access to a Microsoft SQL Server database. After ESX Server is installed, the server can be accessed using a browser (http://servername/) in order to download and install the VMware Virtual Infrastructure Client v2.0.
Although the VMware Virtual Infrastructure Client allows management of a single ESX server (some limited administration is also available via the Virtual Infrastructure Web Client at http://servername/ui/), for a fully functional environment, it is still necessary to install the management component (VirtualCenter Management Server v2.0), which is licensed separately. After extracting the files from the .ZIP file on which they are provided, autorun.exe should be launched and the option to install VirtualCenter Management Server selected. Again, this installation is wizard-based with the only real configuration being the ODBC setup for database access (which needed a system DSN to be configured). Although it can also be installed separately, the VirtualCenter Management Server installation wizard also allows the installation and configuration of the VMware License Server (this will require a license file for the License Server to be configured with).
If the virtual infrastructure will span firewalls, it’s worth making a note of the main ports that will be required for access (although these, and more, are all configurable within the Virtual Infrastructure Client):
- VirtualCenter web service (HTTP/S): TCP 80/443.
- VirtualCenter diagnostics: TCP 8083
- VirtualCenter: TCP 902
- VirtualCenter heartbeat: UDP 902
At this point, installation is just about complete. The Virtual Infrastructure Client can be used to connect to each server and to perform any additional configuration (e.g. amending the security profile, or configuring DNS and routing settings); however it’s worth knowing that by connecting to the VirtualCenter Management Server (rather than an individual ESX server), it is possible to set up logical data centres and clusters/resource pools for HA and DRS.
Configuring licensed features
Ensure that each ESX Server has obtained the relevant licenses using the Licensed Features section of each server’s configuration page within the Virtual Infrastructure Client. Pay particular attention to the License Sources, ESX Server License Type and Add-Ons.
In order to troubleshoot licenses that are not applied, it may be necessary to launch the VMware License Server Tools and perform a server status enquiry (on the Server Status page) or to perform diagnostics (on the Server Diags page). The License file in use is specified on the Config Services page. The VMware Technology Network (VMTN) VMware ESX 3.0 HA fails to accept eval license forum post gives further details of the issues that my colleague and I had with this.
Configuring VMware HA (including configuring VMotion)
To configure HA, a number of actions need to be performed:
- Using the Virtual Infrastructure Client, connect to the VirtualCenter Management Server and create a cluster.
- Ensure that the VMware HA feature is enabled (in the settings for the cluster within the Virtual Infrastructure Client).
- Configure VMware HA options such as the number of allowed host failures and admission controls.
- Add two or more hosts to the cluster.
- Ensure that each of the hosts can connect using a dedicated Gigabit Ethernet NIC (connection type VMkernel) with VMotion enabled (this is established in the networking section of each server’s configuration page within the Virtual Infrastructure Client).
- If not configured at build time, ensure that all servers in the cluster can access the same LUNs on the SAN – this is controlled in the storage (SCSI, SAN and NFS) section of each server’s configuration page within the Virtual Infrastructure Client.
Configuring VMware DRS
VMware DRS is configured in a similar manner to VMware HA – i.e. in the settings for the cluster within the Virtual Infrastructure Client. DRS settings to consider include the automation level and migration threshold as well as rules (to keep multiple virtual machines on the same or separate hosts).
Configuring VMware Consolidated Backup
VCB ought to be simple, except that I haven’t got it working yet. After installing the VCB Framework, the basic principle is that interoperability modules are provided for supported backup software to run pre- and post-backup scripts, allowing the VCB proxy to quiesce each virtual machine and mount the resulting snapshot before backing it up, dismounting and removing the snapshot then moving on to the next virtual machine. The problem is the interoperability modules, which VMware says are provided by the backup software vendors, but I can’t find one for Symantec (Veritas) BackupExec 10d.
Configuring alarms
It is possible to define alarms at various levels in the virtual infrastructure hierarchy (some sample alarms are provided out of the box for host/virtual machine CPU/memory usage and host connection state). These can be set to trigger on a variety of state changes and either send a notification e-mail, SNMP trap or to run a script. E-mail (SMTP) and SNMP settings are defined in the Server Settings from the Administration menu in the Virtual Infrastructure Client.
Creating and importing virtual machines
The creation of virtual machines from within the Virtual Infrastructure Client is straightforward enough (a wizard is provided to assist with the process); however for existing VMs, it’s necessary to use another tool (e.g. VMware Importer).
VMware Importer is a Windows-only tool for converting virtual machines between formats (including Microsoft Virtual PC/Server, VMware Workstation/Server and Symantec Livestate images) and, crucially, can import directly into ESX Server (or via a VirtualCenter Management Server). VMware Importer v1.5 was incorporated into the Windows versions of VMware Workstation v5.5 and VMware Server v1.0 and VMware Importer v2.0 beta 3 (build 28322) is in beta at the time of writing (although this expires on 31 August so hopefully there will be a general release soon).
Suggested further reading
For those who are familiar with previous versions of VMware ESX Server, or who just want to understand a bit more about the products which make up VMware Infrastructure 3, Geert Baeke’s blog has an interesting article on new features in ESX 3.0. Other sites covering virtualisation topics include OzVMs and RTFM Education and official resources from VMware include the VMware Infrastructure documentation, the VMware Infrastructure 3 Online Library and the VMTN.
Thanks to Massimo at IBM Italy and the VMTN Discussion Forums, I found where to download the VCB interoperability modules.
Still no news on the updated VMware Importer and the beta expired yesterday. For now, the reported workaround is to change the date on the importer machine but I haven’t tried that myself.
The VMware Virtual Machine Importer 2.0 release candidate is now available for download.
Hi,
we are considering to buy a VMware Virtual Center.
We have two servers running VMware Standard edition.
Do you believe it will be worth it? Or do we have to
upgrade our VMware licenses to Enterprise before upgrading
virtual center to make it worth it. I had just read the
following article
VMware virtual center real value
@shankyrhodes – whether it’s worth it depends on whether the additional features will provide value to you. I’d suggest that, with only two hosts to manage and no enterprise features (like VMotion, HA, DRS, etc.), it’s probably not worth bothering (you still use the same VI client) but I will caveat that by saying I’m a little out of touch with the VMware solutions these days.