Last year I wrote about the concept of making photographic images – not just taking them and my recent holiday in France was a perfect opportunity to reconnect with my photographic hobby and attempt to make some good landscape images.
I’d also been hearing a lot on the This Week in Photography podcast about the concept of high dynamic range (HDR) images (see TWiP episode 9), where multiple exposures are combined so that one or more shots exposed for the highlights are combined with others that make the most of the shadows and I decided to give that a try.
We were staying in a very attractive area of north-west France РTr̩vignon in Bretagne (Brittany) Рand I found myself inspired to take photographs around the small port at Pointe de Tr̩vignon. Thankfully, I have a very understanding (and patient) wife, as it took several attempts to get the image that I was looking for.
On the first evening, I went down to the harbour and took some photos. They were okay but nothing stunning. Even so, I discovered a couple of basic points that would help me out on future visits:
- It’s really difficult for Photoshop to merge images that involve boats floating on water… the boats move so the images can’t be aligned (I felt such an idiot for not thinking of that one)!
- If you take a set of images adjusting the aperture and the shutter speed then the two cancel one another out and what you end up with is a set of identically exposed images with a varying depth of field (that’s basic stuff from a photography 101)! In the end I settled on using either the camera’s auto-bracketing functionality (which will give me three shots at the chosen exposure interval) or, if I wanted more than three images to merge, shooting on aperture priority with manual focus and then adjusting the shutter speed to bracket the exposures (effectively fixing the focus and depth of field, then adjusting the exposure length to control the light entering the camera).
The next night I went out a bit later – I thought I’d try and catch the sunset. I tried some different sections of the coast to try and get the sun over the sea with some rocks for foreground interest (no boats this time!) but it wasn’t really working out. I’d also got my calculations wrong for when the sun would be setting and in the end I gave up waiting and went back to the house. Sometimes, you just have to accept that the ingredients for a good photo are not all there.
On the third day I had the location sorted (back to Pointe de Trévignon) and went out a bit later in the evening. I watched the sun set for an hour which was beautiful, but I still didn’t think I had the best shots. I was just about to give up when the sun finally set and – Wow! – suddenly the sky had changed and the photographic possibilities opened up to me. In the half hour after sunset I took a shot a lot of images.
This image is one of my favourites from that third night:
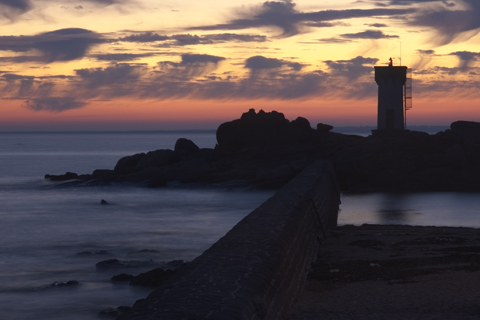
Taken about 30 minutes after sunset, the sky has begun to fade slightly but there is still plenty of colour. I’ve combined exposures taken at 0EV, -1EV and -2EV to create an HDR image then dropped back to 16-bit mode to apply a Photoshop Velvia action before finally straightening the image, cropping and saving as an 8-bit JPEG. Incidentally, I first did this in Photoshop CS2 on the Mac and the process introduced quite a bit of digital noise – switching to Photoshop CS3 seems to have corrected that problem.
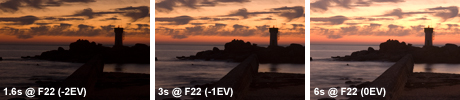
As can be seen from the non-Photoshopped original images below, even without the HDR, underexposing by 1-2 stops seemed to work well (from memory, I probably used a 0.6ND graduated filter to tone down the sky too) but, whilst the the -2EV shot has plenty of sunset detail, it has silhouetted the lighthouse and rocks. The -1EV shot is balanced, but the foreground is still a little on the dark side, whilst the 0EV shot has started to burn out the sky. By merging the three shots I managed to keep both the shadow detail and the highlights and the 6 second exposure from the 0EV shot shows the movement of the water on the exposed side of the harbour wall.
The lesson for me was that I needed to work to find the right location and lighting and, importantly, it was only when I was in the right frame of mind and was excited by the natural world around me that I started to see the real photographic opportunities.
“I often think of that rare fulfilling joy when I’m in the presence of some wonderful alignment of events.
Where the light, the colour, the shapes and the balance all interlock that I feel truly overwhelmed by the wonder of it”
It took three visits before I got the right shots to make this image. Only once I’d fully engaged with the natural world and immersed myself in the environment around me could I unlock the photographic potential of the scene to create some technically correct images that were then combined to make something creatively pleasing.
Of course, there are some who have both the skills and the experience to just know what works and what doesn’t and they might get it right first time. I’m pretty pleased with the final result but it’s far from perfect. I need to get out more and learn what works and what doesn’t. Even after 25 years-or-so of taking photographs, I have too strong a bias towards the technology and I need to work on the creative site of things. I also need to play around a bit more with Photoshop’s HDR capabilities (or possibly some alternative packages) and see how I can gain more control over how the images are merged. For a first attempt at creating an HDR image this is not too bad but professional landscape photographers like Joe Cornish and Charlie Waite have nothing to fear from me just yet!
Well, your results were pretty good, have you tried to bracket more than three exposures for harsher lighting conditions?