Back in the days when I used to shoot my photos on film, my preferred slide emulsion was Fujifilm Velvia (RVP). With strong colour saturation (particularly green) this film is particularly good for landscape work and, ever since I switched to digital, I’ve felt that there was some “punch” missing from my landscapes.
Then I came across episode 19 of This Week in Photography, in which the subject of creating Photoshop actions is demonstrated using “Scott’s Photoshop Velvia”. I tried it out today and it really works.
- Take an image and create a duplicate layer (in the process giving yourself the ability to return to the original at any time).
- Next, use the Channel Mixer on each of the three colour channels (red/green/blue) as follows:
- Red channel: R 118% G -9% B -9%
- Green channel: R -9% G 118% B -9%
- Blue channel: R -9% G -9% B 118%
- Finally, adjust the contrast by tweaking the curves to produce a very slight S shape.
Here’s one of my images before and after the Photoshop Velvia treatment was applied:

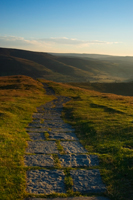
Hopefully you can see that the second image appears much more vibrant than the first.
Photoshop CS3 users can download the Photoshop Velvia custom action, but please note there is no warranty implied, no support, and you use it at your own risk. Thanks are due to Scott Bourne for demonstrating this – it really is a great Photoshop tip.
Cool! Am a fan of velvia too, and kodak 100vs. Thanks for sharing!
Nice tweak! ;D its really god!