 A couple of days ago, my new Arduino board arrived and, last night, I finally got around to having a play.
For those who don’t know what an Arduino is:
“Arduino is an open-source electronics prototyping platform based on flexible, easy-to-use hardware and software. It’s intended for artists, designers, hobbyists, and anyone interested in creating interactive objects or environments.”
[Arduino website]
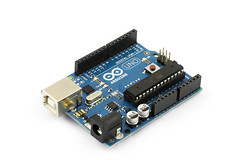
The first thing I noticed was how small the board is (smaller than a credit card) and how large the USB connector makes it… but, when I was working out what I needed to buy (I’ve always been interested in electronics, but never really got into it), I learned a few things about Arduino that might be useful to other newbies:
- You can buy various Arduino boards, with a variety of processors. I picked up an Arduino Uno, which seems to be a good starting point. My Uno shipped with a USB cable that can also provide power (i.e. powering from a battery or other DC source is optional, as Dave Jacoby and Gareth Halfacree confirmed for me on Twitter – thanks guys). Note that some Uno boards have surface-mounted (SMB) chips – you might prefer to go for a DIP version instead (as I did) as this can be swapped out if necessary.
- Shields are boards that sit on top of the Arduino and add additional functionality.
- Whilst my Arduino has an LED on the board that I can interact with to get my head around the concept, you’ll need some more bits and bobs to do anything more complex. There are various starter kits on the interwebs (many or which include the board and a USB cable). I’ve just ordered an ARDX kit from .: oomlout :. (as recommended by Gareth) but one of the reasons for going for this one is that it’s also available without the board if you already have one… when it arrives, I’ll have a breadboard, and a whole bunch of components to try out different ideas and get my head around controlling electronics programmatically.
- I bought my board from Amazon (RS Components’ shipping charges were too high and Maplin’s stock levels are appalling) but, I’ve since been recommended a number of suppliers including the aforementioned .: oomlout :., Cool Components and SK Pang (thanks to Andy Piper).
The intention is that I’ll use one or more of these devices to control a model railway (yes, it’s geeky, but it could be a fun project) but, for now, I’ll start off by getting to grips with turning on lights and other similarly simple tasks, and I’ll probably try and get my sons interested too (they’ve already asked what it is… and seen some videos of other people’s projects).
The Arduino integrated developer environment (IDE) runs on Windows, OS X or Linux but, as this is a geek project and my netbook is basically redundant (and very portable), I decided to use that and install it on Ubuntu (11.10). Installation was very simple (I just followed the instructions on the Arduino Playground – a wiki for the Arduino community – and found v22 of the Arduino IDE in the Ubuntu software centre).

With the IDE installed, I set about writing code. Or, perhaps more accurately, I set about modifying other people’s code. There are a load of examples on the Arduino playground and a good getting started guide for Arduino at Bit-Tech but I found the Arduino Tutorials at Lady Ada really accessible for a newbie like me. Pretty soon I used lesson 1 and lesson 2 to change the 1 second blinking LED on my board to a variety of settings, and finally to just off (ready for when I have a go at this with my son). Once my starter kit arrives with a bunch more components, I’ll try a do something a little more complicated! Maybe one day I’ll even get past the IDE and onto some real C programming (it’s been a while since I wrote any code, let alone in C).
Right… now it’s time to go off and find some cool projects for my new toy…
Image credit: Arduino Uno by Snootlab, on Flickr, used under the Creative Commons Attribution 2.0 Generic licence.
This hardware is for Mac only?
@Alex – No, the hardware is OS-independent and the development environment will work with Windows, Mac, or Linux