Creating an Office 365 profanity filter (works for Exchange too)

This content is 9 years old. I don't routinely update old blog posts as they are only intended to represent a view at a particular point in time. Please be warned that the information here may be out of date.

As part of recreating the rules that my customer currently has set up with a popular cloud-based message hygiene platform, I needed to create an Office 365 profanity filter for Exchange Online. Believe it or not, there isn’t one built into the product (it disappeared with BPOS) but you can do some interesting things with DLP classification rules and policies.

I’d like to publish the exact steps here but I can’t, for commercial reasons. What I can do though is signpost some useful resources:

Once you’ve created a policy you can apply it in PowerShell with:

New-ClassificationRuleCollection –FileData ([Byte[]]$(Get-Content -path ProfanityPolicy.xml -Encoding byte -ReadCount 0))

If you need to update it then the cmdlet is Set-ClassificationRuleCollection and if you want to take it out again, Remove-ClassificationRuleCollection will do the trick.

With the classification in place, you can create rules that use the policy. In my case, one to block emails containing sensitive content (i.e. a list of pre-defined words) and send an incident report to a defined mailbox.

Even though I was working with Exchange Online (v15), the same process will work for Exchange Server 2013 and, presumably 2016 when it comes…

Finally, one gotcha I found (well, it was a user error really):

  • I thought my rule wasn’t working. When I later logged into the shared mailbox that blocked messages were copied to, I found copies of the messages I’d been sending for quite a while. My confusion was because I’d been testing with Policy Tips (which seemed a bit hit and miss in OWA) and that doesn’t actually block the message (doh!). As soon as I enforced the rule, my rude messages started bouncing back as expected…

NDR from message blocked by Office 365 profanity filter

An approach to enabling Office 365 features and functionality using group membership

This content is 9 years old. I don't routinely update old blog posts as they are only intended to represent a view at a particular point in time. Please be warned that the information here may be out of date.

For large enterprises with a mature approach to IT services, the idea of managing access to features and functionality in Office 365 via a web portal is a step backwards. Service desk teams may be given specific instructions and limited access in order to carry out just the tasks that they need to. Arguably that’s not “may be given” but “should only be given”…

One of my customers uses Active Directory groups to assign access to software – for example Project, or Visio – applications that are not universally available. We were talking about doing something similar for Office 365 features and functionality – i.e. adding a user to an Active Directory group to enable an element of their Office 365 subscription (the users are synchronised from the on premises AD to Azure AD).

I suggested writing a PowerShell script to run as a scheduled task, querying the membership of a particular group, and then making the changes in Office 365 to enable particular features. We could use it, for example, to enable a feature like OneDrive for Business to just a sub-set of users; or to assign Project Online or Visio Online licenses.

Well, it turns out I’m no innovator here and it’s already being done elsewhere – Office 365 MVP Johan Dahlbom has published his script at the 365 lab.  I haven’t run the script yet… but it certainly proves the concept and gives us a starting point…

Short takes: PowerShell to examine Azure AD tenants; check which Office 365 datacentre you’re using

This content is 9 years old. I don't routinely update old blog posts as they are only intended to represent a view at a particular point in time. Please be warned that the information here may be out of date.

More snippets from my ever-growing browser full of tabs…

PowerShell to get your Azure Active Directory tenant ID

Whilst researching Office 365 tenant names and their significance, I stumbled across some potentially useful PowerShell to read your Azure Active Directory tenant ID.

Get-AzureAccount

I’m not sure how to map that tenant ID (or even the subscription ID, which doesn’t seem to relate to any of my Office 365 subscriptions) to something meaningful… but it might be useful one day…

Script to retrieve basic Office 365 tenant details

I also found a script on the Microsoft TechNet Gallery to retrieve basic details for an Office 365 tenant (using Get-MsolDomain, Get-MSolAccountSku and Get-MSRole).

Check which datacentre you’re connected to in Exchange Online

Office 365 uses some smart DNS tricks to point you at the nearest Microsoft datacentre and then route requests across the Microsoft network. If you want to try this out and see where your requests are heading, just ping outlook.office365.com and see the name of the host that replies:

Administering Office 365 using PowerShell: updated information on the required components

This content is 10 years old. I don't routinely update old blog posts as they are only intended to represent a view at a particular point in time. Please be warned that the information here may be out of date.

I’ve written before about administering Office 365 from PowerShell but the process has changed slightly over the years.  There are various articles out there on the web with methods and links but the key information (as at August 2014) is in a TechNet article titled Manage Azure AD using Windows PowerShell.  Yes, that’s right – Azure AD – because Windows Azure Active Directory is the authentication service used by Microsoft Online Services such as the Office 365 services.

On my Windows 8.1 computer I already had the necessary .NET framework and PowerShell pre-requisites but I did need to download and install two more components before Get-Command -Module msonline would do anything for me:

  1. The Microsoft Online Services Sign-In Assistant for IT Professionals RTW (the version I used was 7.250.4556.0, published on 17 February 2014).
  2. The Windows Azure AD Module for Windows PowerShell* (which depends on the Microsoft Online Service Sign-In Assistant), which doesn’t come up in a search on the Microsoft Downloads Center but is linked from the TechNet article I mentioned above (32-bit and 64-bit versions).

With these components installed, I could authenticate against the service using my normal credentials with Import-Module MSOnline and Connect-MsolService and run administration cmdlets from within PowerShell.  Note that in order to run Exchange cmdlets, you’ll need a remote PowerShell session to Exchange (check out Greg Shields’ TechNet magazine article Manage Office 365 with Windows PowerShell for more details). There are also additional modules for managing Lync Online and SharePoint Online.


* The Windows Azure Active Directory Module for Windows PowerShell cmdlets were previously known as the Microsoft Online Services Module for Windows PowerShell cmdlets.

Remote PowerShell to manage Exchange, even without the Exchange Management Shell installed

This content is 10 years old. I don't routinely update old blog posts as they are only intended to represent a view at a particular point in time. Please be warned that the information here may be out of date.

Following on from yesterday’s Exchange Admin Center/Outlook Web App tips, I thought I’d share another gem that came from Microsoft Exchange Premier Field Engineer and PowerShell author Mike Pieffer (@mike_pfeiffer) in the Microsoft Virtual Academy Core Solutions of Microsoft Exchange Server 2013 Jump Start course.

Sometimes, you’ll need to perform an operation on an Exchange Server and you won’t have the Exchange Management Shell installed.  You may be able to carry out the operation graphically using the Exchange Admin Center but, more likely, you’ll need to invoke a remote PowerShell session.

The magic commands (which need PowerShell v2 or later) use implicit remoting via the IIS PowerShell virtual directory (proxied via an Exchange server with the CAS role installed):

$session = New-PSSession -ConfigurationName microsoft.exchange -ConnectionUri http://servername/powershell
Import-PSSession $session

After running these commands, you should be able to run Microsoft Exchange cmdlets, as long as you have the appropriate permissions assigned via Exchange’s Role Based Access Control mechanism. I’ve used the same approach previously to connect to Exchange Online (Office 365) using remote PowerShell.

A couple of additional points to note: because you’re running a remote PowerShell session, you’ll also need the script execution policy to allow RemoteSigned scripts; also, don’t forget to tear down the session when you’re done, using Remove-PSSession $session.

“Rogue” retention policies in Exchange Online after false positive junk mail is moved to the Inbox

This content is 10 years old. I don't routinely update old blog posts as they are only intended to represent a view at a particular point in time. Please be warned that the information here may be out of date.

My Office 365 tenant was recently upgraded to the “Wave 15” version of the service, meaning that my email is now hosted on Exchange 2013, rather than 2010 (Microsoft has provided an article that helps users to understand which version of the service they are on).

Unfortunately, since the upgrade, an awful lot of my legitimate email is getting trapped as junk.  After moving it back to the Inbox, I noticed that one of the items displayed a message about retention policies, highlighting that it would expire in 30 days.

I don’t use retention policies (with gigabytes of empty space in my mailbox I don’t need to), so I thought this was a little strange, until I realised that this was a side effect of having been previously flagged as junk, where there is a retention policy set to remove mail after a month.  I then found that the Managed Folder Assistant (which applies the retention policies) only runs every 7 days on Exchange Online but can be forced in PowerShell.

Sure enough, once I’d eventually managed to connect to Office 365 in PowerShell and run the Start-ManagedFolderAssistant -Identity mailboxalias command, the email was no longer flagged for expiry.

There’s more information on setting up and managing retention policies in Exchange Online with Windows PowerShell on the Outlook.com help pages.

Issues connecting to Office 365 using PowerShell? Check the client firewall

This content is 10 years old. I don't routinely update old blog posts as they are only intended to represent a view at a particular point in time. Please be warned that the information here may be out of date.

I’ve written previously about managing my Office 365 tenant using Windows PowerShell (Microsoft has since provided its own documentation on the topic) but I tried today and found that I couldn’t get a connection.

Every time I tried to create a session, the response came back as:

[ps.outlook.com] Connecting to remote server failed with the following error message : The WinRM client cannot process the request because the server name cannot be resolved. For more information, see the about_Remote_Troubleshooting Help topic.

+ CategoryInfo : OpenError: (System.Manageme….RemoteRunspace:RemoteRunspace) [], PSRemotingTransportExc
eption

+ FullyQualifiedErrorId : PSSessionOpenFailed

Strangely though, it could resolve the server name as nslookup ps.outlook.com told me:

Non-authoritative answer:
Name: pod51000psh.outlook.com
Address: 132.245.1.167
Aliases: ps.outlook.com

Microsoft knowledge base article 2570535 includes steps for troubleshooting Windows PowerShell issues that affect Exchange Online for Office 365 and suggested

This issue occurs if an internal firewall isn’t started or if the Windows Remote Management service isn’t started

I confirmed that WinRM was running and allowing basic authentication but still couldn’t connect.  So I focused on the “internal firewall isn’t started” part.

Sure enough, the issue was Symentec Endpoint Prevention on my corporate laptop.  I used my wife’s PC instead, and connected with no issues at all…

Searching Active Directory with PowerShell and a user’s phone number

This content is 11 years old. I don't routinely update old blog posts as they are only intended to represent a view at a particular point in time. Please be warned that the information here may be out of date.

I have a guilty secret: I screen my incoming phone calls. I no longer answer blocked numbers on my work phone – it’s always PPI spam – and I recognise the numbers of those I work closely with, so I can prioritise my response (i.e. do I want to be interrupted by that person, or can I respond to voicemail later?). To be honest, it’s just the same with email – some people will get an immediate response, others will need more thought and I’ll respond when I have more time (or not, in some cases). Is it unprofessional? I don’t think so – it’s about time management.

Recently, I had a missed call on my mobile from a number I didn’t recognise. I could see it was internal (all of our mobile phones have the same first few digits) so I thought I’d search the Global Address List in Outlook. Unfortunately though, Outlook doesn’t let me search the GAL on phone numbers…

I could have just called them back (actually, I did!) but the geek in me had the bit between the teeth… could I script up some kind of reverse lookup for phone numbers? And, in true Barack Obama (or Bob the Builder if you’re on this side of the Atlantic) style, the answer turns out to be:

“Yes, we can!”

So, if you use a Windows PC and you like scripting, read on. If you don’t, probably best just call the number back and see who answers!

Getting ready to query Active Directory with PowerShell

The first hurdle was that, in order to query Active Directory from PowerShell, I needed to have the Remote Server Administration Tools (RSAT) component installed on my Windows 7 workstation in order to do this, but it’s actually a two-step installation process.

  1. Firstly, download and install the RSATs to the workstation.
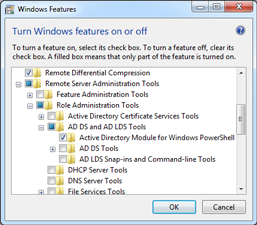
  2. In Control Panel, Programs, Programs and Features, Turn Windows features on or off, make sure that the Active Directory Module for Windows PowerShell is available under Role Administration Tools, AD DS and AD LDS Tools.

Once the RSATs were installed and the Active Directory Module for Windows PowerShell was enabled, I could fire up Windows PowerShell and issue the command to load the Active Directory management cmdlets:

Import-Module ActiveDirectory

Finding the available attributes to search against

Next up, I needed to know which properties are available for an Active Directory User object. I used my own email address as a filter to Get-User, which retrieved the details for the given AD User object, then selected all properties and piped the resulting output into Get-Member (which gets the properties and methods of objects):

Get-ADUser -Filter {EmailAddress -like "user@domain.com"} -Properties * |
Get-Member -MemberType property

Building up confidence, I started to play around and query individual attributes for the selected object:

$user = Get-ADUser -Filter {EmailAddress -like "user@domain.com"} -Properties *
$user.Title
$user.OfficePhone
$user.SAMAccountName

I found that each of these returned the information I would expect for my own user account in Active Directory.

Constructing the query

The next step was to search the whole directory but this time to filter the properties returned and to pipe through Where-Object to match certain criteria, then pipe the resulting output from that query into a table:

Get-AdUser -Filter * -Properties OfficePhone |
Where-Object {$_.UserPrincipalName -match "Wilson"} |
Format-Table OfficePhone,UserPrincipalName

This returns the office phone number for everyone whose user name contains the string Wilson.  That tested the principle but was not the query I was trying to create, so I edited the query to match a number against a number of phone number properties (making sure that all the properties that need to be displayed are in the filter) and also prompted for the search string, storing it in a variable:

$Search = Read-Host 'What number would you like to search for?'
Get-AdUser -Filter * -Properties OfficePhone,MobilePhone,TelephoneNumber |
Where-Object {$_.OfficePhone -match $Search -or $_.MobilePhone -match
$Search -or $_.TelephoneNumber -match $Search} |
Format-Table GivenName,Surname,OfficePhone,MobilePhone,TelephoneNumber

This time, the resulting output was exactly what I was after – a single entry matching the partial phone number I’d asked it to match (824753 in the example below):

GivenName  Surname  OfficePhone  MobilePhone    TelephoneNumber
---------  -------  -----------  -----------    ---------------
Mark       Wilson   73824753     +447xxx824753  73824753

Finally, I wrapped the whole thing up in a script and, as long as I’ve done the usual Set-ExecutionPolicy remotesigned stuff, I can perform reverse lookups on phone numbers to my heart’s content… now, if only I could have an iPhone app to do this for me when the calls come in…

Office 365 password resets… and disabling password expiry

This content is 12 years old. I don't routinely update old blog posts as they are only intended to represent a view at a particular point in time. Please be warned that the information here may be out of date.

My Office 365 account password expired today and, somewhere in the midst of the password reset I managed to lock myself out.  As I only have one mailbox on the account (i.e. I am the administrator), that’s a bit of a problem…

I tried creating a service request to reset my password but I’m not sure it worked – I had no call-back and when I checked later in the Administrator control panel, there were no requests listed; however Dhaval Brahmbhatt (@DhavalBrahmbhat) gave me some UK phone numbers to try (0203 450 6455 or 0800 032 6417).

Using phone support I was able to log a password reset request, once the Technical Support Engineer had confirmed my details.  Because there was no phone number shown on my records, he had to email me so that I could respond with the details. Bearing in mind that I was locked out of my account, this could have been a problem but thankfully Outlook was still connected to Office 365 from my Mac.

After 26 minutes on the phone (at great expense to Microsoft, I guess), I finally had a temporary password to reset my account and then log in as normal.

Goodness knows how I’d have managed if I hadn’t been able to receive an email on the account – although the contact preferences on my Office 365 profile showed a phone number, there was no number in the information for my mailbox… so, lesson number 1, make sure you have a phone number in your mailbox properties (lesson 2 might be to have password resets sent to an alternative mailbox but that seems daft as it’s also where other announcements will end up…).

I’ve decided that I’ll reset my password when I feel like it, rather than when the system says so and making this change involves some PowerShell:

  • First up, install the Office 365 cmdlets (intended for enterprises, not all of them will work on small business accounts). There are two components to install: the Microsoft Online Services Sign-In Assistant; and the Microsoft Online Services Module for Windows PowerShell.
  • Next, connect PowerShell to Office 365 by either opening the Microsoft Online Services Module for PowerShell or opening a normal PowerShell session and typing import-module MSOnline.
  • Authenticate the session by typing Connect-MsolService

(An older method from Office 365 beta can be found in my previous post on changing the primary email address for Office 365 users – I haven’t tested it recently, but I see no reason why the standard Exchange cmdlets wouldn’t still work on Office 365)

  • Finally, disable password expiration with the following command (replacing MicrosoftOnlineServicesID with the appropriate username):
    Set-MsolUser -UserPrincipalName MicrosoftOnlineServicesID -PasswordNeverExpires $true