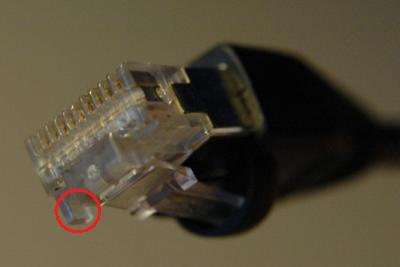
Earlier today, I needed to configure an HP StorageWorks Modular Storage Array (MSA) 1000 which I’ll be using for SAN storage over the next few weeks. Nothing too difficult about that, except that I wanted to access the SAN via the command line interface (CLI) and that meant using a serial cable to connect to the MSA controller. Each controller has what looks like an RJ45 Ethernet connection on the front, but standard Ethernet cables don’t fit. Fortunately I found the console cable that had been delivered with the SAN and found that it uses a slightly unusual variation of an RJ45 connection, which further research indicates is called an RJ45Z. The only noticeable difference (apart from how the connector is wired internally), is an extra notch on one side, as shown in the picture below:
Incidentally, once the connection is made from a standard RS232 serial port to the MSA (most modern notebook PCs don’t have a serial port – I had to use an IBM USB-serial/parallel adapter), accessing the CLI simply involves starting Windows HyperTerminal with the following connection settings:
- Connect using: comportidentifier (e.g. COM1)
- Bits per second: 19200
- Data bits: 8
- Parity: None
- Stop bits: 1
- Flow control: None
Once connected, it may be necessary to press the Enter key until the CLI> prompt is displayed, after which commands can be issued to configure the MSA.
Further details can be found in the HP StorageWorks Modular Smart Array 1000/1500cs Command Line Interface manual (just in case, like me, you found this information using Google before you got around to reading the manual that came on a CD with the MSA!).
HP new part number for the serial cable is 316131-001
Kevin – thanks for the HP part number. Mark
Hi, just thought I would let you know your link to the CLI Reference guide is a 404.
Thanks Ben, unfortunately that happens sometimes with big sites like HP’s.
“The only noticeable difference (apart from how the connector is wired internally), is an extra notch on one side”
… and, of course, the extra 2 pins!
Hello Mark
Do you eventually have the pinout of this DB-9 to RJ45Z MSA-1000 Consoloe Cable?
I’ve foud the schematic at the Internet at the beginning of this year, but it disapperars….
With regards
Michael
Sorry Michael, I don’t have those details – it’s been a long time since I saw one of those cables!
Having just acquired an MSA1000 I too was faced with the console cable issue. I set about figuring it out and now have a pinout diagram if anyone is interested.
Basically, take a standard RJ45 cable and chop off one end. On the RJ45 plug that will connect to the MSA1000, file down RJ45 lug. Connect these wires or cores if you prefer as follows.
RJ45 Pin 1 is Tx and goes to Pin 2 Rx on DB9
RJ45 Pin 8 is Rx and goes to Pin 3 Tx on DB9
Rj45 Pins 4 & 5 are both Ground and go to Pin 5 on DB9
Thanks for that info Steve – I’m sure that will help someone out tremendously!
Thx, for the information. Today I purchased a second hand MSA1000 where the serial cable was not shipped. Use the grinder to remove the corners of the connector and soldered all together. Works like a charm! Many thx.
I just sawed the lugs on one side of the RJ45 cable with a mini hacksaw and plugged it into the MAS100 and the other into a DB9/RJ45 adapter. I opened the adapter and adjusted the cabling here. I needed to reseat the controller and when it started up, it came online using HyperTerminal.
Great tips – works perfectly
Thanks working good. If anybody needs the HP cmd line ref. guide for this product, do a web search for: “c01183955.pdf”.