A few months ago, I wrote that I was looking for an iSCSI target add-on for my Netgear ReadyNAS Duo. I asked if such an add-on was available on Netgear’s ReadyNAS community forums; however it seems that these are not really a true indication of what is available and the moderators are heavily biased by what Netgear supports, rather than what can be done. Thanks to Garry Martin, who pointed me in the direction of Stefan Rubner’s ReadyNAS port of the iSCSI Enterprise Target Project, I now have a ReadyNAS acting as an iSCSI target.
I have a lot of data on my first ReadyNAS and, even though I backed it all up to a new 1.5TB drive in my server (which will eventually be swapped into the the ReadyNAS as part of the next X-RAID upgrade), I wasn’t prepared to risk losing it so I bought a second ReadyNAS to act as an iSCSI target for serving virtual machine images. In short, don’t run this on your ReadyNAS unless you are reasonably confident at a Linux command prompt and you have a backup of your data. This worked for me but your mileage may vary – and, if it all goes wrong and takes your data with it, please don’t blame me.
First up, I updated my ReadyNAS to the latest software release (at the time of writing, that’s RAIDiator version 4.1.6). Next, I enabled SSH access using the Updates page in FrontView with the EnableRootSSH and ToggleSSH addons (note that these do not actually install any user interface elements: EnableRootSSH does exactly what it says, and when it’s complete the root password will be set to match the admin password; ToggleSSH will enable/disable SSH each time the update is run).
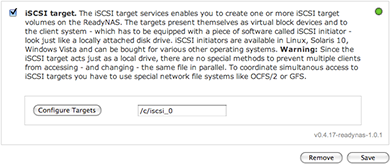
The next step was to install the latest stable version (v0.4.17-1.0.1) of Stefan Rubner’s iSCSI target add-on for ReadyNAS (as for EnableRootSSH and ToggleSSH, it is simply applied as an update in FrontView).
With SSH enabled on the ReadyNAS, I switched to using a Mac (as it has a Unix command prompt which includes an SSH client) but any Unix/Linux PC, or a Windows PC running something like PuTTY will work too:
ssh root@ipaddress
After changing directory to /etc (cd /etc), I checked for an existing ietd.conf file and found that there was an empty one there as ls-al ie* returned:
-rw-r–r– 1 admin admin 0 Dec 3 2008 ietd.conf
I renamed this (mv ietd.conf ietd.conf.original) and downloaded a pre-configured version with wget http://readynasfreeware.org/gf/download/docmanfileversion/3/81/ietd.conf before editing the first line (vi ietd.conf) to change the IQN for the iSCSI target (a vi cheat sheet might come in useful here).
As noted in the installation instructions, the most important part of this file is the Lun 0 Path=/c/iscsi_0,Type=fileio entry. I was happy with this filename, but it can be edited if required. Next, I created a 250GB file to act as this iSCSI LUN using dd if=/dev/zero of=/c/iscsi_0 bs=10485760 count=25600. Beware, this takes a long time (I went to the pub, came back, wrote a good chunk of this blog post and it was still chugging away for just over 4 hours; however it’s possible to get some idea of progress by watching the amount of free space reported in FrontView).
At this point, I began to deviate from the installation notes – attempting to run /etc/init.d/rfw-iscsi-target start failed so I rebooted the ReadyNAS but when I checked the Installed Add-ons page in FrontView I saw that the iSCSI target was already running although the target was listed as NOT_FOUND and clicking the Configure Targets button seemed to have no effect (I later found that was an IE8 issue – the button produced a pop-up when I ran it from Safari over on my Mac and presumably would have worked in another browser on Windows too).
I changed the target name to /c/iscsi_0, saved the changes, and restarted the ReadyNAS again (just to be sure, although I could have restarted the service from the command line), checking that there was a green light next to the iSCSI target service in FrontView (also running /etc/init.d/rfw-iscsi-target status on the command line).
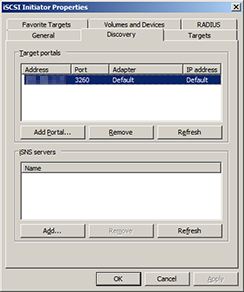
With the target running, I switched to my client (a Windows Server 2008 computer) and ran the iSCSI initiator, adding a portal on the Discovery tab (using the IP address of the ReadyNAS box and the default port of 3260), then switching to the Targets tab and clicking the Refresh button. I selected my target and clicked Log On… waiting with baited breath.
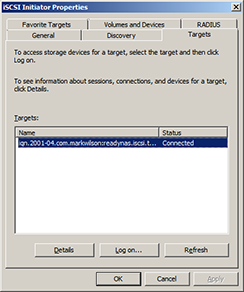

No error messages indicated that everything was working so I switched to Server Manager and saw a new 250GB unallocated disk in Disk Management, which I then brought online and initialised.
Finally, I updated /etc/rc6.d/S99reboot to include /etc/init.d/rfw-iscsi-target stop just before the line that says # Save the last 5 ecounters by date.
Hi Mark,
Does this iSCSI-ready NAS work with VMware ESX?
Cheers.
@Kent – I guess it should do but I haven’t tried because ESX (and ESXi) are more picky about the hardware they run on (consequently I only have one machine that can run ESX and it’s being used to run Windows Server). At the end of the day, the solution I used is an open source iSCSI implementation and, as long as it follows the RFC, then ESX shouldn’t care.
Hey Mark, I have followed the steps correctly. But when clicking on configuring target in frontview, I can type the name for the target ( /c/iscsi_0 ) but theres no save button in that popup, when I click the text just goes away and no target has been added. tried several browsers…
Hi Lars – is there a “green light” next to the iSCSI target add-on in FrontView (as in the screenshot on this post?). You might find that you need to restart the ReadyNAS again before the iSCSI target service will run (or at least
sshonto the ReadyNAS and run/etc/init.d/rfw-iscsi-target restart). Also, the save button is only active when the cursor is in the field to specify the target name.It looks like Stefan has updated (and moved) the iSCSI target installation instructions in the last few days – they might help as they have some slightly different steps for setting the iSCSI service to run at startup (mine seems to do that automatically).
Mark
Hey! Yes theres a green light and I have restarted the service and rebooted the nas several times. Ill check when i get home if I can manage to see the save button while the cursor is in the field. thx.
And great site btw!
Thanks for the feedback Lars – good luck with yor ReadyNAS.
I have the new iscsi target installed “iSCSItarget_1.4.18-readynas-1.0.0.bin” but i dont get the config button, i only see the donate button. for work around i setup luns by putting them in de ietd.conf.
Has the config button been removed in the new version?
Robin
Question re increasing the size of a LUN,
When testing the LUN I created one that was to small for my needs do I just run the dd if=/dev/zero of=/c/iscsi_0 bs=10485760 count= command again with the appropriate LUN size?
@Robin – sorry, I haven’t tried v4.1.8.
@Chris – that should work, although it’s not something that I’ve tried myself
Thank you your instructions worked perfectly for my SBS 2008 server with 2TB drive installed in the ReadyNAS Duo.
Cheers!
I’m running iscsi target addon version 0.4.18 on a ReadyNAS NV+ box (RAIDiator v4.1.6) and the iscsi performance is half that of CIFS. What kind of performance are guys seeing with this addon compared to standard file sharing protocols? ps. I’m testing using the windows iscsi initiator and a 5GB volume.
Here are vmstat results when transferring with CIFS and iSCSI collected on the NV+ while running the transfers:
CIFS:
procs ———–memory———- —swap– —–io—- –system– —-cpu—-
r b swpd free buff cache si so bi bo in cs us sy id wa
1 1 0 3408 10176 183632 0 0 2 18822 7701 730 7 78 7 8
1 0 0 3552 10080 183696 0 0 0 22232 7984 795 7 83 5 5
1 1 0 3584 10128 183600 0 0 0 20538 8106 799 7 86 2 4
1 1 0 3136 10240 183968 0 0 2 20530 7762 772 8 87 2 3
1 0 0 3616 10320 183456 0 0 0 22200 8047 799 7 87 1 4
1 1 0 3248 10400 183760 0 0 0 15406 6125 611 5 66 14 14
1 0 0 4416 10368 182624 0 0 0 22234 8060 799 8 84 2 5
0 1 0 3248 10368 183824 0 0 2 18828 7416 748 8 78 7 7
1 0 0 4048 10400 182960 0 0 0 18788 6756 684 14 66 10 10
1 1 0 4288 10272 182848 0 0 0 20532 7800 776 10 84 3 3
iSCSI:
0 1 0 3440 11584 183232 0 0 392 6174 3220 1824 0 3 8 88
0 2 0 4112 11616 182560 0 0 388 6120 3196 1784 0 3 8 88
0 1 0 4128 11664 182496 0 0 390 6144 3222 1790 0 3 8 89
0 1 0 3920 11696 182640 0 0 392 6176 3238 1833 0 3 8 89
0 1 0 3776 11728 182784 0 0 394 6212 3263 1805 0 3 9 88
0 1 0 4288 10880 183120 0 0 390 6142 3229 1950 0 3 10 87
0 1 0 4368 10896 183040 0 0 386 6090 3205 1825 0 5 9 86
0 1 0 3472 10928 183904 0 0 384 6046 3157 1874 0 4 9 87
0 2 0 3424 10944 183936 0 0 392 6176 3259 1898 0 5 8 87
You can see the IO is eating up most of the cpu time during the iscsi operation.
Is anyone seeing iscsi outperforming CIFS / NFS etc?
Hi, I was using CIFS on the ReadyNAS to store music/video, allowing me to access by various media extenders across my home network. However, when ripping CD’d or video editiing (using WIN 7 Ultimate), performance was rubbish. So. I followed Marks instructions and implemented an ISCSI LUN, performnace is excellent, ripping/video editiing, play back via MCE all great. But, now my digital items are confined to the ISCSI LUN. Could the Duo advertise the LUN via CIFS/DLNA/UPNP in read only mode so my other media extenders can access the digital media?
Hi,
I have configured my ReadyNAS NV+ with latest version and I could see the disk in my windows 2008 server. When i try to add the disk in my windows failover cluster configuration, i get error and also disk goes to reserved mode. Has anyone tried using windows cluster failover?
@ Robin
I see the same in version 1.4.18 (nothing but the paypal donation). If you run /etc/init.d/rfw-iscsi-target restart after creating your volume, the service will start. The LUN is specified in ietd.conf, so you do not need to worry about the GUI field.
Also, I noticed that 1.4.18 running on 4.16 firmware makes it so the reboot from the GUI is broken and does not work. Not a big deal for me, but it should be reported as a bug.
Running 1.4.20.1 on an NV+ and everything appears to be in order (the target service is running, config is in place, target LUN file is in place). That being said I’m not seeing any targets being advertised. I’ve captured the iscsi session in Wireshark and I see good negotiation, authentication (none) and a request from my computer (Win7) to show all targets. However the reply doesn’t appear to include any targets.
Are there any internal logs that I can look at to see what’s going on? Anyone else seen this?
Hi Nathan,
I had the same issue and found the problem was the ietd.conf file. When I created/edited one (via copy/paste), I couldn’t find any targets but when I did a wget “http://readynasfreeware.org/attachments/download/6/ietd.conf” it found the target fine (in vi each line is delimited by ^M – that must make the difference). Hope that helps…
Hi Mark,
The link to http://readynasfreeware.org/gf/download/docmanfileversion/3/81/ietd.conf appears to be broken. Is there somewhere else I can get this file.
Thanks
Bryan Schreenan
Hi
Did you manage to find an answer to the targets not being found or advertised? Im having exactly the same issue I tried the suggestion of just downloading the ietd.conf direct to the /etc but still no joy. The daemon is running fine I can connect to it without issue but no targets appear. I have tried three different systems still no joy and also 2 NV+ boxes both with the latest firmware and latest ISCSI add on. If I use SSH explorer I can see the target in /c and the ietd is configured to point at it. The only thing I can think of is both NV+ boxes were already configured and had data on them so something is remiss as their seems to be some other issues with front view. For example if i click on the shutdown and reboot they dont do it I have to do a reboot through SSH. If I click on the reset to factory default under upgrade it pretends to do it for about 10 seconds and doesnt. Can i factory reset through SSH? I have backed up all the data so no issue there.
Hi,
I think at some version the ietd config files have been moved from /etc to /etc/iet/, and therefore, there is no target to be found unless you place the new and updated ietd.conf file in /etc/iet/ietd.conf
After moving ietd.conf to the above location, for me the target appeared right away when hitting the refresh.
Hi JMB,
I have managed to boost Iscsi performance far above CIFS by using blockio vs the documented fileio.
to do so, I changed my readynas DUO to flexraid by factory defaulting it, then on one disk I created a new volume, while to initiate the second disk, I first created a second raid0 volume and after that, removed it again.
Then in /etc/iet/ietd.conf, I set my LUN 0 to point to /dev/hde3 using BLOCKIO.
this boosted the performance of ISCSI significantly.
second I enabled jumbo frames, which again showed a significant improvement.
Third I tuned the TCP window sizes and saw another speed improvement.
here’s a a vmstat output from my iscsi vs CIFS using large file transfers(not sure about performance for random IO as i don’t use that for my media files and backups):
ISCSI:
procs ———–memory———- —swap– —–io—- –system– —-cpu—-
r b swpd free buff cache si so bi bo in cs us sy id wa
2 0 0 7968 72560 33312 0 0 0 42000 8193 555 0 97 3 0
0 0 0 7680 72560 33312 0 0 0 43036 8457 561 0 97 3 0
1 0 0 7680 72560 33312 0 0 0 43020 8354 535 0 97 3 0
1 0 0 7728 72560 33312 0 0 0 43032 8383 529 1 98 1 0
1 0 0 7968 72560 33312 0 0 16 42032 8206 577 0 97 3 0
1 0 0 7728 72560 33312 0 0 0 41996 8212 522 2 95 3 0
1 0 0 7920 72560 33312 0 0 0 43024 8409 533 0 100 0 0
1 0 0 7680 72560 33312 0 0 0 42004 8231 539 0 96 4 0
CIFS:
procs ———–memory———- —swap– —–io—- –system– —-cpu—-
r b swpd free buff cache si so bi bo in cs us sy id wa
1 0 0 6096 9536 112176 0 0 17 152 182 142 1 18 81 0
2 0 0 6032 9152 112512 0 0 512 20608 4672 205 9 91 0 0
1 0 0 6128 8928 112832 0 0 512 21248 4563 211 10 90 0 0
1 1 0 5680 8928 113248 0 0 640 20480 4736 190 13 87 0 0
1 0 0 5536 8928 113328 0 0 512 20480 4673 186 6 94 0 0
1 1 0 5984 8928 112784 0 0 512 20480 4682 172 10 90 0 0
1 1 0 5840 8864 112848 0 0 640 20480 4708 198 10 90 0 0
2 1 0 6480 8880 112528 0 0 512 19984 4668 202 11 89 0 0
1 2 0 6416 8736 112672 0 0 512 21216 4717 176 13 87 0 0
1 2 0 6352 8720 112688 0 0 512 20480 4720 167 7 93 0 0
Hi what is the highest size disk you can use.
I want to use 6TB shared storage so i can run my vms off it and all file as a test.
Thanks
Mat
Hii Geert
how can I check which / dev / hd?? is my second hdd.
I want to test your configuration based on BLOCKIO
post the line of the ietd.conf configuration ?
Thank you in advance
Hi dr.gazza,
This is the line in ietd.conf for my blockio disk:
Lun 0 Path=/dev/hde3,Type=blockio
running the command “mdconfig” will show you what partitions are in use.
Make sure not to touch the partitions used in any of the mdconfig output. /dev/hd?1 and /dev/hd?2 are probably used for the OS, so make sure not to touch them, /dev/hd?3 is the data partition in my case.
here’s mine:
it shows
/dev/hde1, /dev/hde2, /dev/hdc1, /dev/hdc2 and /dev/hdc3 are all in use by flexraid, but after removing the temporarily created volume-D, it will not show /dev/hde3 to be used.
The output depends on what slot your disk is positioned in your readynas.
nas:~# mdconfig
Device : /dev/md0
Create Time : 1286107941
Update Time : 1289820491
RAID Level : 1
RAID Capacity : 2047936
Disk Size : 2047936
Chunk Size : 0
Disks : 2
RAID Disks : 2
Active Disks : 2
Working Disks : 2
Failed Disks : 0
Spare Disks : 0
State : 1 [ Clean ]
Disk Device RAID Disk Maj/Min Sectors State
—————————————————————————
0 /dev/hdc1 0 22/ 1 4096000 6 [ Active Sync ]
1 /dev/hde1 1 33/ 1 4096000 6 [ Active Sync ]
Device : /dev/md1
Create Time : 1286107942
Update Time : 1286308391
RAID Level : 1
RAID Capacity : 524224
Disk Size : 524224
Chunk Size : 0
Disks : 2
RAID Disks : 2
Active Disks : 2
Working Disks : 2
Failed Disks : 0
Spare Disks : 0
State : 1 [ Clean ]
Disk Device RAID Disk Maj/Min Sectors State
—————————————————————————
0 /dev/hdc2 0 22/ 2 1048576 6 [ Active Sync ]
1 /dev/hde2 1 33/ 2 1048576 6 [ Active Sync ]
Device : /dev/md2
Create Time : 1286094356
Update Time : 1286094356
RAID Level : 0
RAID Capacity : 1950934016
Disk Size : 1950934016
Chunk Size : 16384
Disks : 1
RAID Disks : 1
Active Disks : 1
Working Disks : 1
Failed Disks : 0
Spare Disks : 0
State : 1 [ Clean ]
Disk Device RAID Disk Maj/Min Sectors State
—————————————————————————
0 /dev/hdc3 0 22/ 3 -393099090 6 [ Active Sync ]
For those who are having trouble getting targets to show up: there are actually two important lines in the ietd.conf file:
You have to uncomment the line starting with ‘Target’, and underneath that, you have to set up the ‘Lun’ line described above.
Hi
Not quite working for me
* No SAVE Button, Green Light & ticked on the add-on
* I’m using the latest v1.4.20.2-readynas-1.0.5
*/etc/ietd/ietd.conf
Target sally.com:sally-storage.target0
Lun 0 Path=/c/iscsi_0,Type=fileio ( tabbed) from the begining coloum)
*sally-2:/c# ls -l i*
-rw-r–r– 1 root root 104857600000 Apr 8 21:00 iscsi_0
*sally-2:/c# ps -ef | grep iet
root 946 1 0 2:42 ? 00:00:00 /usr/sbin/ietd
===========================================
any ideas anyone ?
thanks in advance
Sally
Sally,
I had the same problem.
Finally, I killed the ietd process and restart it with /etc/init.d/rfw-iscsi-target start. and the iscsi target was discovered! (Before, I was doing /etc/init.d/rfw-iscsi-target restart or stop- start but the iscsi target would not show up)
my conf file:
nas1:/etc/iet# cat ietd.conf
Target iqn.2001-04.com.example:readyduo.iscsi.target0
Lun 0 Path=/c/iscsi_0,Type=fileio
#
Mark,
Thanks a lot for these invaluable instructions.
Hello Mark,
I got some quistions. I got a readnas nv+ and installed all the addons and the latist firmware on the nas.
the trouble is that i got only windows systems (2008 server an windows 7 workstations) When i start up PuttY i got the login screen. after i give mine user account and password PuttY shuts down.
Do you have a manual how to configure the NAS in windows.
thanks Roy
Sorry Roy but I don’t know anything about the NV – I only have Duos. The ReadyNAS Community forums might be able to help though…
@Roy, I had the same problem and then realised the patch I’d added was enable root ssh. The clue is in the name use ‘root’ as the username and the password for your admin account. Using admin or any other user causes putty to close on connection for whatever reason. There’s another patch called enable user ssh but you need to use the root account to complete the above anyway.
@Mark, Thanks for this post it helped immensely!
Hi Mark, do you have the ietd.conf still by any chance? The link on the post is now no longer working?
Sorry Harry – that will be long since gone… the ReadyNAS suffered a RAID failure a few years ago and after that I stopped using it as an iSCSI target; however, I did track down what appears to be the same software, at https://rnxtras.com/addons/iscsi-target-readynas-4-sparc