I’ve written before on this blog about my experiences getting started with Raspberry Pi (attempt 1 and attempt 2) but, in my post about the inaugural Milton Keynes Raspberry Jam this morning, I highlighted something that became very apparent within the assembled group of Raspberry Pi enthusiasts at Bletchley Park:
“It’s all to easy to forget that, although the current version of the Pi was intended for developers in preparation for a broader educational release, it’s been massively popular with 350,000 boards shipped (and on target for a million by the end of the year!). Add to that, the Raspberry Pi foundation is 20 guys and girls who don’t get paid and who have day jobs – that’s a very limited resource pool to support an awful lot of people! Even so, the Raspberry Pi is not necessarily the most user-friendly experience for those who are not used to hacking around in a command line interface […]”
With that in mind, this blog post is intended as a basic guide for those who don’t have 20 years of experience working in IT, or are not bedroom coders, but do fancy getting stuck in to creating new and exciting things with a small and inexpensive computer. Regular readers may find that I explain things in more detail than usual but I’m assuming the audience are complete beginners when it comes to using a Raspberry Pi and that they do not spend their time geeking out with bits of hardware or bytes of software. If I’ve missed anything – or made some invalid assumptions – please leave a comment on this blog post, or tweet me (@markwilsonit) but please bear in mind that I have a day job too (so my response might not be immediate) and I can’t answer every single question about getting started with a Raspberry Pi!
What’s in the box – and what else do I need?
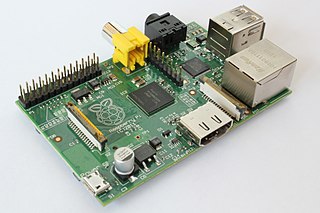
At its most basic level, the Raspberry Pi is a single board computer. Some distributors may sell bundles with mice, keyboards, etc. but many people will just get a board like the one shown here:

That means there are some essentials to buy:
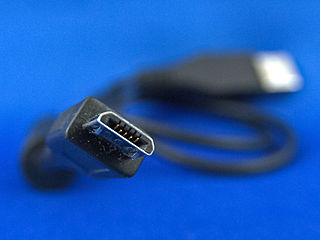
- A 5V power adapter with a micro-USB type B connection (I use the one that came with my mobile phone but not all phones have these):

- A USB keyboard – i.e. a keyboard with a USB type A connection like the one below:

- A USB mouse (if you want to run a graphical user environment – i.e. one that is not just text-based)
- An SD card with an operating system. I recommend that beginners start out with one that comes pre loaded, for example with Raspbian Linux. If you are going to “roll-your own” then that can be more complex and my earlier post based on Debian “Squeeze” might help but that’s a lot more technical and certainly outside the scope of this basic guide.
- A television or digital computer monitor with either an RCA component, DVI, or HDMI input. VGA will not work. See below for details of what these connections look like.
- A cable to connect to the Raspberry Pi to the television or computer monitor. The type of cable will depend on the type of connection.
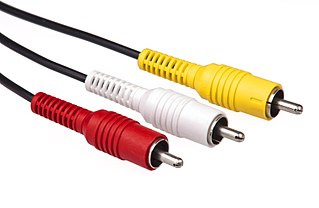
- RCA cables look like this (normally red and white are used for audio and yellow is used for video, but it doesn’t really matter – the cables are identical):

- DVI cables look like this (the picture shows the “male” format, with the pins sticking out – the “female” version has holes and is normally found on the back of a computer):

- HDMI cables look like this:

You can also get a cable to connect from HDMI to DVI(and a connector to connect two “male” DVI cables
) – these are not expensive and are what I use with my Raspberry Pi.
- VGA connectors look like this (these are very common on both old and new monitors but the Raspberry Pi does not have a VGA output):

- RCA cables look like this (normally red and white are used for audio and yellow is used for video, but it doesn’t really matter – the cables are identical):
- An Ethernet cable with an RJ45 connection to connect to your home broadband router/modem (Wi-Fi on the Raspberry Pi can be tricky – a cabled connection is often easiest to start with) – often these are supplied by your ISP with the router/modem:

- Some headphones or speakers with a 3.5mm stereo TRS connection (if you want to hear any sound from your Raspberry Pi):

You might also want to buy a case for your Raspberry Pi but that is by no means essential. Many people will already have the components listed above but if you need to buy them, they shouldn’t be too expensive. Probably the most expensive parts are the keyboard and mouse but I picked up a wireless mini keyboard and mouse from Maplin today for £14.99 and they worked out of the box with my Pi. You might also want to get a powered USB hub if you plan to use more than two USB devices (for example if you want to plug in a webcam, a USB flash drive, or a hard disk).
Putting it together
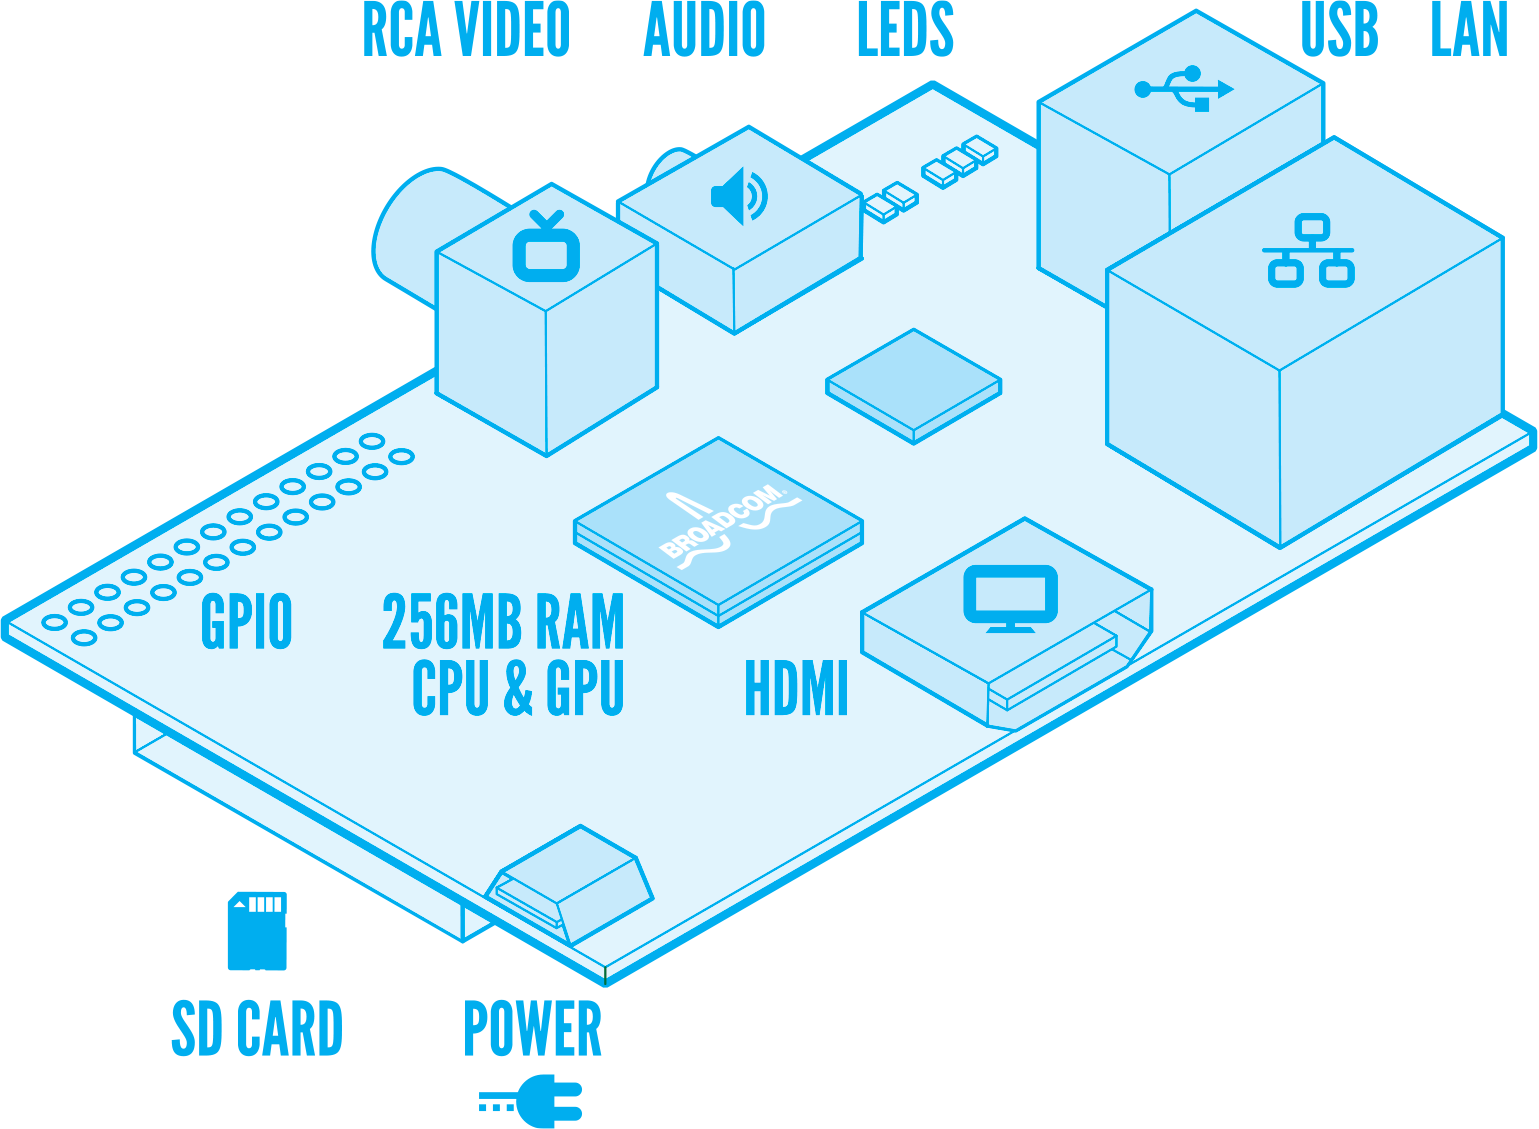
All of these components are different sizes and shapes so should be pretty easy to plug in. It doesn’t matter which of the two USB plugs are used for the keyboard and the mouse but this diagram (from the Raspberry Pi Foundation’s quick start guide) should help:

Just make sure that the power is coming directly from a 5V supply plugged into the mains and don’t be tempted to run a cable from a USB socket on a PC!
The operating system
Remember that I said I wasn’t going to show you how to prepare your Raspberry Pi with an operating system? There are other guides on the Internet (the Raspberry Pi website is a good place to start) but I strongly recommend you buy an SD card with Raspbian pre-loaded.
If you don’t know what an operating system is, don’t worry – it’s the software that runs on a computer when you turn it on and performs basic functions like driving the screen, keyboard, etc. (like Microsoft Windows on most PCs or Mac OS X on Apple Macintosh computers). Modern operating systems tend to include other functions, like web browsers and media players. Other applications can then be installed on top of the operating system to carry out more specialised tasks (like a word processor, an image editing package, or communications software like Skype).
Raspbian is a Linux operating system – that means that it is freely available (although some organisations might charge for supporting Linux distributions) and that the operating system is similar in many ways to a system called Unix that has been around for over 40 years and is used on many computer systems all over the world.
Logging in and getting going
After all of the “peripherals” (screen, keyboard, etc.) have been plugged in and the power has been switched on, you should see some characters appear on the screen and a prompt to login.
At the login prompt (which will say something like raspberrypi login: followed by a flashing _ cursor) type the username pi and press the Enter key, then type raspberry and press Enter at the password: prompt.
Once you are logged in, the prompt will change to pi@raspberrypi:~$ followed by a flashing _ cursor. This is username@machinename so you can see that your user is pi and the computername is raspberrypi.
These are the default username and password settings but you really should change the password to something that only you know (I’ll tell you how to do this in a moment).
The first time you start your Raspberry Pi (the first “boot”, as us geeks like to say), your Pi will prompt you for some setup information. It’s important to select the options to expand_rootfs (expand the operating system to use the whole of the memory card) and change_pass (change password).
If you ever need to run this setup programme again, then the command to type is:
sudo raspi-config
Press the Enter key after typing the command (and for any other commands in this blog post). Then, just follow the instructions on screen.
Many people will find the command line interface (text-only, also called a CLI) unfriendly, so you can load a graphical user interface (GUI) to see something a little more familiar, driven by a mouse, and with applications in windows. To do this, the command is:
startx
This will slow down the Raspberry Pi a bit but it should be OK. There is a status indicator towards the bottom right of the screen (a green/black bar graph) that shows how busy the Raspberry Pi is. There are many applications pre-installed on the Raspberry Pi, accessible via the start menu (just like on Windows) and you can download others from the Internet (I’ll leave that for now – there’s plenty to get started already pre-loaded in Raspbian). Here are just a few ideas to get going with your Raspberry Pi:
- You could try some programming in Scratch, or Python.
- Or if that sounds a bit much for now, just browse the Internet (the browser is called Midori).
- And, if you need to run any more commands from the CLI, then you can launch an application called LXTerminal.
Updating your Raspberry Pi
Before I sign off, it’s probably worth mentioning some commands that might be necessary to update the software on your Pi. Before I do that, I’ll explain something else – remember the command to run the Raspberry Pi Configuration Utility?
sudo raspi-config
The sudo part of this is worth remembering. Your username on the Raspberry Pi (pi) is what we call a standard user. It runs with a lower level of permissions to prevent any unintended consequences from running applications that might change the configuration of your system. When we want to make deliberate changes, we use sudo to run a command as a super user (like an administrator in Windows or Mac OS X).
So, to update the software on the Raspberry Pi, run:
sudo apt-get update
sudo apt-get upgrade
APT is the Advanced Packaging Tool – so apt-get is getting details of available software. update downloads details of the available packages (a “resync”). upgrade is updating the operating system.
Finally, there is a tool called rpi-update that can be used to update the firmware (that’s the really low-level code that drives the components on the Raspberry Pi board, underneath the operating system). This isn’t installed by default and is written by a programmer called Hexxeh. You can find more details on Hexxeh’s blog and download rpi-update with these commands:
sudo wget http://goo.gl/1BOfJ -O /usr/bin/rpi-update
sudo chmod +x /usr/bin/rpi-update
This will download the rpi-update program and then change the permissions so that it can be executed (run) on the local computer. I found that I also needed to install git before I could use rpi-update:
sudo apt-get install git-core
Then type:
sudo rpi-update
to update the firmware on your Raspberry Pi. Generally you will only need to do this if you are having problems getting something to work.
Wrapping up
So, we’ve seen:
- What you need to buy/find to get your Raspberry Pi working.
- How to logon to a Raspberry Pi running Raspbian and how to get past the command line and into a more familiar (graphical) environment.
- Some basic commands to keep your Raspberry Pi up to date.
If you want to learn more, check out the Raspberry Pi Foundation website and there are also other resources available on the Internet. You could also read a book like Meet the Raspberry Pi by Gareth Halfacree and Eben Upton.
Acknowledgements
Much of the information in this post is from a talk given by Peter Onion (@PeterOnion) at the Milton Keynes Raspberry Jam, with additional input from Rob Bishop (@Rob_Bishop) of the Raspberry Pi Foundation.
The illustrations used are taken from Wikipedia and elsewhere as follows:
- Raspberry Pi Model B by Wikipedia user JWRogers, licensed under the Creative Commons Attribution-Share Alike 3.0 Unported license.
- Micro USB B by Wikipedia user Masamic, licensed under the Creative Commons Attribution-Share Alike 3.0 Unported license.
- USB type A by Wikipedia user Evan-Amos, made available under the Creative Commons CC0 1.0 Universal Public Domain Dedication.
- RCA connections by Wikipedia user Evan-Amos, public domain.
- DVI connection by Wikipedia user Evan-Amos, public domain.
- HDMI connection by Wikipedia user, Evan-Amos, public domain.
- VGA connection by Wikipedia user, Evan-Amos, public domain.
- Ethernet connection by Wikipedia user David Monniaux, licensed under the Creative Commons Attribution-Share Alike 3.0 Unported license.
- TRS Mini Jack by Wikipedia user Evan-Amos, public domain.
- Raspberry Pi board diagram by Paul Beech.
Due to the licensing conditions of the images listed above, this blog post (but not the rest of this website), is licensed under the Creative Commons Attribution-Share Alike 3.0 Unported license.
Hi Mark, I was at the Jam on Sunday! Fantastic, very well-written guide. Just what is needed for beginners. I’m hoping to put together some kind of printed guide for the next Jam and may well be asking if I can crib from your guide. Mine gets a bit “Use arrow keys and press enter” which might be a bit tooooo basic. ;-)
Hi Michael – no problem at all – after all, most of this blog post came from Peter, Rob and Wikipedia!
Hi there. I was just sent here via a tweet and I have to say you’ve really explained it well at exactly the right level for non-technical total beginners :)
Thanks Mary – that’s really great to hear and feedback like yours makes the time spent writing this worthwhile!
Good guide for beginners, particularly the pics of each connector type.
One thing though – shouldn’t the wget & chmod commands also use sudo?
Thanks Bryan – and you’re absolutely right, there were some missing
sudos – corrected now (it was getting late when I finished this last night…) – well spotted!Excellent guide, but is it possible to ‘brick’ the Pi with ‘rpi-update’?
Gareth, I’m not 100% certain, but my understanding is that in this case the “firmware” exists on a boot partition on the SD card, rather than reprogramming a chip on the board (which is what you do when updating the firmware on your mobile phone, for example). For that reason, I think you should be fairly safe but it might be worth checking on the Raspberry Pi forums for a better answer.
Great post. was just looking for this as I just got my Pi!!! On to the experiments then.
Dhaval, hope you have fun. I might have a post up on RasPi Wi-Fi in a day or two…
Great writeup. The only missing piece which wasn’t covered in detail was the power supply. We’re finding that the recommended 5V 750mA micro usb power supply just won’t cut it and causes all sorts of lockups. If you add a USB WiFi adapter and a keyboard, we’ve also had problems even with 1 amp power supplies. Our recommendation would be to search for a 1.2A or 1.8A device. You can’t have “too much” in the amperage department. If you don’t need it, then it won’t get used.
Good point Ward!
For reference, the power supply I’m using takes a 100-240V 50-60Hz 0.15A AC input and outputs 5V DC at 1A. It’s standard UK 3-pin to USB adapter from Nokia (that came with mu Lumia 800) but I have a similar one from Apple (that came with my iPad, or maybe an iPhone) and you can also pick this sort of thing up in Maplin, B&Q, etc.
excelent guide
Hi Mark,
I’m a newbie and I need a tutorial how to install additional software on Raspbian, such as AbiWord or Gnumeric. Can you write a tutorial about this? Thanks.
Good idea – I’ll try and write something soon… although I’m a bit “time poor” at present!
Hi Mark, Cn you tell me how to start up de LXTerminal from CLI?
Hi Bala – sorry if I wasn’t clear – LXTerminal can be launched inside the GUI to provide a CLI for issuing text-based commands.